Pumice liner instructions

PUMICE LINER INSTALLATION INSTRUCTIONS

The pumice liner system comes in a range of 15 diameters from 150mm to 1000mm with T Liners, Liner Support Blocks, and Adaptors for ease of connection to the appliance.

VIDEO GUIDE

The video shows a guide on how to install a liner system.

TYPICAL LINER INSTALLATION DETAIL

Construction begins by providing a suitable foundation and constructional hearth in accordance with Building Regulations and site requirements.

STOVE IN RECESS OPTION
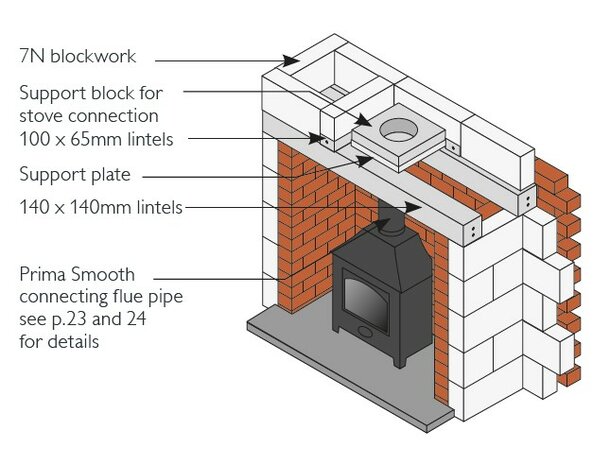
Our pre stressed lintels must be installed above the fireplace recess , for this method a support plate is required under the support block.
Alternatively a suitable cast-in-situ concrete slab lintel can be created above the fireplace recess. (See Isokern standard drawings for hole size depending on diameter of chosen flue).
The support block is bedded onto the slab lintel using weak mix mortar. A stainless steel adaptor is used to connect from the support block to the stove flue pipe. This adaptor is pushed up onto the support block spigot (fibre rope should be used to create a seal). It is recommended to have a minimum of 600mm length of flue pipe before connecting to the chimney.

FREE STANDING STOVE OPTION
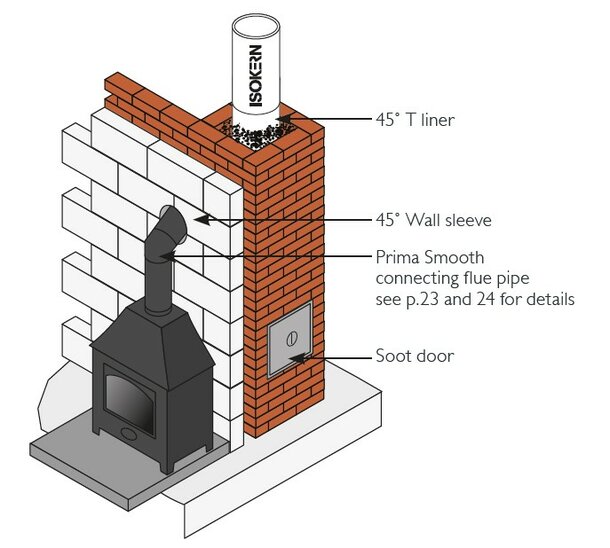
A soot door must be provided below the flue pipe entry to allow for inspection and removal of soot and debris. A suitable wall sleeve is to be used to seal the cavity wall. Any combustible insulation within the wall must be kept away from the single skin connecting flue pipe by at least 1.5 x its diameter.

A stainless steel adaptor is fitted to the Isokern T Liner with the fibre tape supplied. The flue pipe is a push fit over the spigot on the adaptor. Seal off the gap between the flue pipe and wall sleeve with fire proof rope and closing plate.

OPEN FIRE OPTION
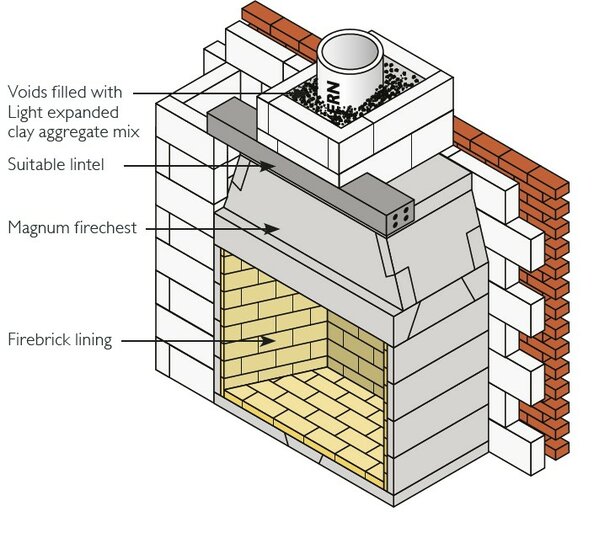
Install the firechest onto the constructional hearth using lip glue making sure all elements are level. 100mm of brick or blockwork must be built around the sides and back of the firechest to comply with Building Regulations. The inside of the firechest must be finished with a suitable fireback or firebrick slips.
Install the gather using lip glue making sure all elements are level. The front face of the gather can be finished with plasterboard, rendered or clad in masonry. Lintels may be required above the gather to help carry the brick or blockwork. The maximum loading capacity of the Isokern firechest and gather is 2500kg.

ALL OPTIONS
The flue liners are installed socket uppermost and sealed with Isokern lip glue. Finished lip glue joints should be 2-3mm thick. A special bag is provided for ease of application and the lip glue should be applied in 12-15mm beads. Remove any excess glue to maintain a smooth surface. Clad the liners with a minimum of 100mm thick brickwork or medium density (7kN) blockwork. A minimum thickness of 15mm Light expanded clay aggregate insulation must be installed between the liners and masonry. Mix 20 parts to 1 part opc cement and a small amount of water. Make sure it is well mixed before using.

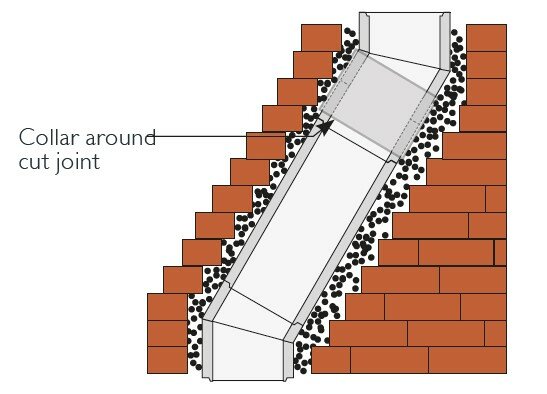
If bends are required in the chimney make sure adequate support is provided and always backfill with light expanded clay aggregate insulation mix. Liners can be cut between bends to achieve a required offset distance. A steel collar as well as lip glue must be used for any cut joints. A maximum of 2 complete offsets (4 bends) are allowed per chimney and the angle must not be greater than 45˚ from the vertical.


You must provide adequate clearance from combustible material in accordance with Building Regulations Combustible materials must be 200mm from the inner surface of flue liner or 40mm from the outside of the masonry chimney unless it is a floorboard, skirting board, dado or picture rail, mantel-shelf or architrave.
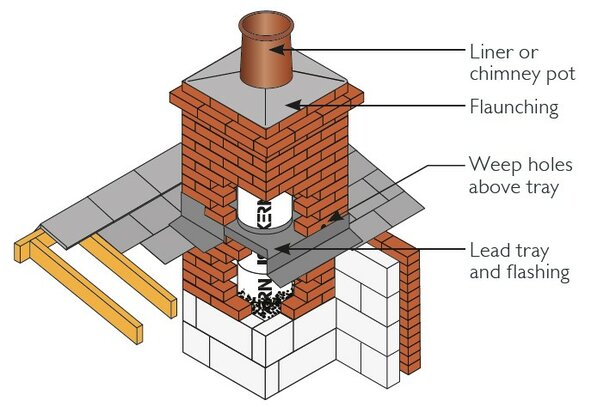
Fit appropriate lead dpc’s and flashings in accordance with the relevant regulations. Isokern recommend that the lead tray should be dressed up the outside of the flue liners to avoid a weak joint. Weep holes should be provided above the tray for moisture drainage.
Terminate the chimney to the correct height in accordance with document J of the Building Regulations. The chimney can be finished by flaunching (1:3 cement/sharp sand) either around the Isokern flue liner or a suitable chimney pot. Approved rain caps can be used to help prevent water entering the flue.

AFTER COMPLETION

After installation is complete tests and checks should be carried out in accordance with document J of the Building Regulations. A chimney notice plate must be completed and permanently fixed in the dwelling, ideally near the electrical consumer unit. The checklist and notice plate are available from Schiedel Isokern.


USE AND MAINTENANCE
The chimney should be left for at least 72 hours before use, then start with only small fires for the first week and gently increase thereafter.
The chimney should be swept at least twice a year, once before the heating season and once after the heating season. You may need to sweep during the heating season depending upon use. The brush should be a medium density polypropylene bristle type and should be the same diameter as the flue. Steel brushes must not be used to sweep Isokern pumice flues.
Always follow the appliance manufacturer’s operating instructions. Always burn approved fuels or dry seasoned wood. Avoid burning unseasoned wood and slow burning of solid fuels as this can produce excessive soot and condensation which can in turn cause soot fires and damage. If correctly installed, operated and maintained these systems could last the life of the dwelling.