BUILDING REGULATIONS

The construction and application of chimneys and flues is covered by Building Regulations in conjunction with the relevant European Standards. Whilst these differ in emphasis, they all mandate the safe application of the chimney no matter where and how used. These Regulations and Standards dictate the minimum criteria which it is necessary to apply if the chimney or flue is to function safely and correctly.
Building control approval is necessary for building new chimneys and in some cases for relining old chimneys particularly if some alteration or change of the heating appliance occurs. The appropriate Regulations and Standards are listed below.
England & Wales:
Building Regulations Approved Document J
Scotland:
Building Regulations Technical Standards
Northern Ireland:
Building Regulations Technical Booklet L
Republic of Ireland:
Building Regulations Technical Guidance Document JBUILDING REGULATIONS

FLUE SIZING

It is important to match the internal diameter of the flue with the outlet on the appliance. It should never be less than the outlet diameter of the appliance. The appliance manufacturer’s chimney sizing recommendations should always be followed.
For open fires with a standard fire opening up to 500mm wide by 550mm high the minimum required flue diameter is 200mm round. For larger open fires, such as inglenooks, dog grate installations or special appliances and stoves designed to operate with a fire opening greater than 500mm x 550mm, the flue size should be at least 15% of the free unobstructed area of the fire opening (including sides if open). Many Decorative Fuel Effect gas fires (DFE’s) that imitate a coal or log burning open fire require the same chimney arrangement as for solid fuel open fires and must be installed in accordance with respective local building regulations.

CHIMNEY CONSTRUCTION

1. The first chimney block is set on a bed of mortar on top of the prefabricated gather or support block, depending on your appliance. Schiedel Rapid HT Cement is applied to the recess into which the liner will locate.

2. Bend and place the insulation into the chimney block. Care should be taken to ensure the slots in the mineral wool are compressed inwards. It is important the insulation is fitted as below to ensure consistent insulation around the flue pipe.

3. Place the flue liner into the chimney block. with the female rebate facing upwards. Arrows on each flue liner indicate the directional flow of flue gases. Continue to apply high temperature cement to each flue liner, cleaning any access material from the joints.

4. The chimney blocks should be tied every metre to a structural wall with the supplied masonry/steel frame ties.
Standard timber frame ties (not included) should be used in timber frame construction.

5. Where the chimney passes through floor or ceiling joists, these need to be trimmed out leaving a gap of 40mm for timber and 30mm for concrete. This gap is then filled with non-combustible material.

BEND KIT

1. Build the chimney to the point where the bend is required. The steel locking band should be placed around the liner in the chimney block before the bend.

2. Place the first chimney bend block on top of the standard chimney block. Insert the first insulated flue bend.

3. Add the second chimney bend block with the angled edge face down. Make sure the block is properly supported.

4. Place the straight edge of the third chimney bend block on top. Insert the insulated ceramic return bend into the bend block

5. Position the final bend block angle edge down to return the kit to the horizontal. The steel locking band should be placed around the liner in the chimney block before continuing to add more blocks.

RENDERED STACK

1. Continue to build the chimney as a single block to the stack. Special plastic connectors are inserted in all 4 corners of the chimney block to provide stability against wind loading. These should be used from a point 1 metre below the last point of lateral support.
Reinforcement bars should be used instead of the plastic connectors for chimney stacks over 1.2m high. (see p. 17)

2. Place the coping on a bed of mortar on top of the DPC coping tray.

3. Place the chimney pot on the coping ensuring the space between the pot and coping is sealed with mortar or other non-porous material

4. Finally apply an exterior waterproof render.

BRICK STACK

1. A corbel is required for brick or block cladding. This give a stack of 675mm x 675mm or 3 bricks by 3 bricks.

2. Continue to build the chimney block on the corbel. Keep the cavity between the block and outer skin clear of mortar. A chimney tray is recommended for brick clad stacks. Fit the chimney tray over the chimney block and let it rest on the bricks as shown with the apron on the slope side. Wall weeps should be put into the brick joints to ventilate and remove any trapped moisture.
Chimney Trays are an additional option and can be produced to specific requirements

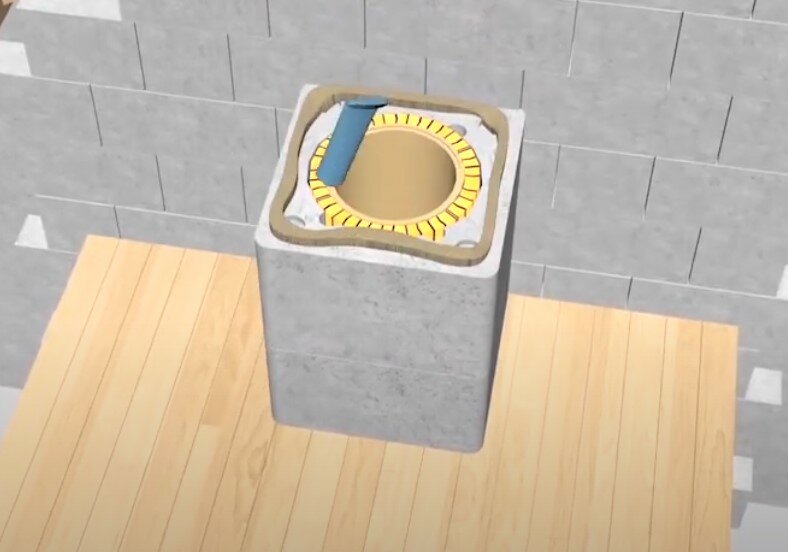
3. Before placing the coping tray into position, ensure the chimney block and the outer skin are at the same level at the top of the stack. Place the coping tray into position on a bed of mortar and ensure the gap between chimney block and outer skin is sealed properly.

4. Place the coping on a bed of mortar on top of the DPC coping tray.

5. Place the chimney pot on the coping ensuring the space between the pot and coping is sealed with mortar or other non-porous material. Also inside the chimney pot seal the space between the pot and expansion plate with mortar or other non-porous material.

REINFORCING BARS

Reinforcement bars should be used instead of the plastic connectors for chimney stacks over 1.2m high. The bars must start 1m below the last point of lateral support

1. Start by inserting the plastic stoppers into the holes on the block before the first one with bars

2. Screw the bars together and inset equal lengths into the 4 holes. The liquid grouting mortar should be poured into the reinforcing channels. Keep the reinforcing bars centred.

AFTER COMPLETION

After installation is complete tests and checks should be carried out in accordance with document J of the Building Regulations. A chimney notice plate must be completed and permanently fixed in the dwelling, ideally near the electrical consumer unit. The checklist and notice plate are available from Schiedel.

USE AND MAINTENANCE

The chimney should be left for at least 72 hours before use, then start only with small fires for the first week and gently increase thereafter.
The chimney should be swept at least twice a year, once before the heating season and once after the heating season. You may need to sweep during the heating season depending upon use. The brush should be a medium density polypropylene bristle type and should be the same diameter as the flue. Steel brushes must not be used to sweep the flues.
Always follow the appliance manufacturer’s operating instructions. Always burn approved fuels or dry seasoned wood. Avoid burning unseasoned wood and slow burning of solid fuels as this can produce excessive soot and condensation which in turn cause soot fires and damage. If correctly installed, operated and maintained these systems should last the life of the dwelling.